⚠️ I’m not using this approach anymore. I found it much better to use GitHub submodules to achieve this. I wrote about how to do that here. ⚠️
How to use Obsidian for your Astro website’s content writing workflow.
Integrating Astro posts to be edited in Obsidian is quite easy. For this to work we just need to link files with symbolic links(mklink). This post is focussed on Windows, but this is also possible on Mac by slightly adjusting the command.
Integrating Obsidian Into Astro
I love writing in Obsidian. And just like Astro content collections, Obsidian is also based on .md files. So how can we utilise this to write markdown files in Obsidian that get added into our Astro project?
There are two solutions:
- Create an Obsidian vault within your Astro project. Then add the Obsidian project file to gitignore.
- Create a folder in our Obsidian vault that has its content linked to the content in our Astro project.
Both options are valid solutions. We will first focus on solution 2 since that might seem like the easier and cleaner solution.
(Mac uses a different command, check out this video by Lazar Nikolov who explains how to do it on Mac.)
Linking folders with symbolic links on Windows (10 / 11)
To start, open the cmd as an administrator. On the bottom left search on Windows, enter “cmd”, right click and select “Run as administrator”.
Here we will use mklink /D LinkToNewFolder LinkToOriginalFolder to create a symbolic link.
Symbolic links are advanced shortcuts in Windows 11 and Windows 10 that can point to a file or folder, redirecting applications to access them as if they were in a different location.
For my environment the command looked like this: mklink /D "D:\Bryan\Documents\Vaults\Posts\Bryan's Blog\Content\Blog" D:\Bryan\Documents\Code\astrobryan\src\content\blog
If you use paths that have empty spaces you need to put quotation marks around them.
The first path creates a new folder in my Obsidian project. The second path is the folder that contains all my .md posts in my Astro project.
Now you can already edit all of your posts using Obsidian. But the images are still missing.
Including Images
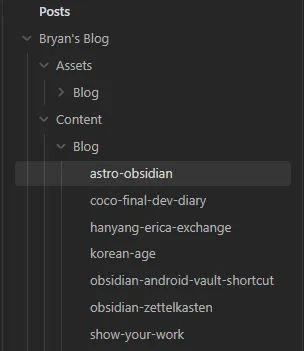
I advise you to use a similar structure in your Obsidian vault as you have in your Astro project.
We use the same command this time, but instead we use the assets folder as the origin and point to the new assets folder of our Obsidian Vault: mklink /D "D:\Bryan\Documents\Vaults\Posts\Bryan's Blog\Assets\Blog" D:\Bryan\Documents\Code\astrobryan\src\assets\blog.
Now we can see all our images and edit our Astro posts, all within Obsidian. We can define templates to pre-define content we would use on every new post, such as the frontmatter, content structure, image links, html snippets, or anything really.
I also changed how the frontmatter is displayed. You can do this under Settings -> Editor -> Properties in document -> Source, this way the frontmatter looks more clear.
That’s it! 🎉 Enjoy writing your posts in Obsidian now.
The Problems
This method isn’t perfect and might cause a few problems.
It mainly causes problem with syncing your files. Google Drive Desktop can’t sync any files that come from a symbolic link. Obsidian sync also does not support this. Obsidian even includes a “Use at your own risk” warning for symbolic links and junctions.
If we only use this solution to write our posts and then commit these to git we don’t have any problems with losing data though. Since everything is still saved securely in our project and only how we edit it has changed.
Further Adjustments - My Solution
I like having a separate vault for each Astro project. By doing this I can use different plug-ins and templates for each project, something I personally prefer. With my approach I can also have the same Obsidian environment on different devices.
My solution was to combine both the previously mentioned solution 1 and 2.
Create a folder in your Astro project like .obsidian-vault. Create another folder within that, the folder name of this will be the name of our vault. Here we create a new Obsidian vault. You will now have a folder structure that should look like this: AstroProject > .obsidian-vault > ObsidianVaultName > .obsidian.
Now we can adjust our vault, add the templates we need, change the settings and style however we like. If wanted we can push our obsidian setup to git, after that I would add the .obsidian-vault folder to our .gitignore, so that VS Code doesn’t tell us to commit and push any changes within our Obsidian editor to git, otherwise any new windows we open in Obsidian would be registered as a change in our codebase.
To add our .obsidian-vault to .gitignore you just need to add this line: .obsidian-vault
Then it’s time to add the folders that actually have the content we need.
Create a symbolic link within that folder, mine looked like this: mklink /D D:\Bryan\Documents\Code\astrobryan\.obsidian-vault\ToLearnKorean\Content D:\Bryan\Documents\Code\astrobryan\src\content.
Then we create another folder for the assets folder: mklink /D D:\Bryan\Documents\Code\astrobryan\.obsidian-vault\ToLearnKorean\Assets D:\Bryan\Documents\Code\astrobryan\src\assets.
With this solution we won’t cause any problems in a shared environment, and we also keep our ability to write our Astro content in Obsidian how we want. All while still being able to share the same Obsidian environment / layout across different devices.
Note, to get this working between a google drive folder and local windows file you have to use /J instead.
Write me your questions on any of my socials linked at the bottom or top of this page. Any feedback or other responses are also welcome!
References
- Symlinks on Windows explained (also explains differences between
/D,/Jand/H): https://www.howtogeek.com/16226/complete-guide-to-symbolic-links-symlinks-on-windows-or-linux/ - The post that introduced me to symbolic links: https://www.reddit.com/r/ObsidianMD/comments/1943yza/a_lazy_mans_obsidian_astro_workflow_integration/
I want to hear your feedback! Was something confusing? Did you get stuck? Did you find this post amazingly helpful? Was it all very mid? Let me know per e-mail or at any of my social media spaces!